使用ImageAI多对象检测
现在对象检测技术在各行各业已迅速得到了采用。它帮助自动驾驶汽车安全地行驶,在拥挤的场所发现暴力行为,协助球队分析和制作选秀报告,确保制造零件得到适当的质量控制,不一而足。
比如在一张风景图中,可以识别出人物,风景,云朵,山水等
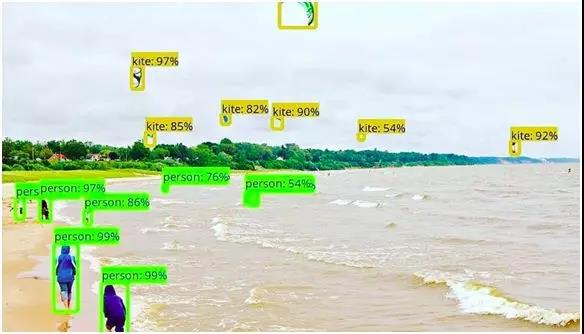
或者在交通视频中,可以识别行人,车辆,交通灯等各种对象,对各对象位置加以标注。
ImageAI提供已经训练好的模型,可以轻松识别图片中各种对象,并加以标注。
# 使用 ImageAI 对图片中出现的对象进行检测,返回对象的质心位置。
# ImageAI(https://github.com/OlafenwaMoses/ImageAI)

# 创建python3环境
conda create -n retinanet python=3.6 anaconda


# 激活环境
source activate retinanet
conda install tensorflow numpy scipy opencv pillow matplotlib h5py keras
In [ ]:
# 安装ImageAI
!pip install https://github.com/OlafenwaMoses/ImageAI/releases/download/2.0.1/imageai-2.0.1-py3-none-any.whl
Looking in indexes: https://pypi.tuna.tsinghua.edu.cn/simple
Collecting imageai==2.0.1 from https://github.com/OlafenwaMoses/ImageAI/releases/download/2.0.1/imageai-2.0.1-py3-none-any.whl
  Downloading https://github.com/OlafenwaMoses/ImageAI/releases/download/2.0.1/imageai-2.0.1-py3-none-any.whl (137kB)
    100% |████████████████████████████████| 143kB 124kB/s
Installing collected packages: imageai
Successfully installed imageai-2.0.1
In [ ]:
# 下载RetinaNet模型:
!wget https://github.com/OlafenwaMoses/ImageAI/releases/download/1.0/resnet50_coco_best_v2.0.1.h5
In [ ]:
from imageai.Detection import ObjectDetection
from IPython.display import Image
import os


execution_path = os.getcwd()

detector = ObjectDetection()
detector.setModelTypeAsRetinaNet()
detector.setModelPath( os.path.join(execution_path , "resnet50_coco_best_v2.0.1.h5"))
detector.loadModel()
custom_objects = detector.CustomObjects(person=True, car=False)
detections = detector.detectCustomObjectsFromImage(input_image=os.path.join(execution_path , "image.png"), output_image_path=os.path.join(execution_path , "image_new.png"), custom_objects=custom_objects, minimum_percentage_probability=65)


for eachObject in detections:
    print(eachObject["name"] + " : " + eachObject["percentage_probability"] )
    print("--------------------------------")

Image("image_new.png")
博客地址:http://blog.yoqi.me/?p=13587 
这篇文章还没有评论